‘What is a Shared Mailbox?’
The use of Shared Mailboxes allows users with the required permissions to send from and access the same email account. This is one inbox that is shared between users.
A Shared Mailbox ‘shares’ it’s calendar and contact list between all authorised users. It also allows users to delegate their own permissions to any Folders/Subfolders in the mailbox.
Users cannot log into Shared Mailboxes. You cannot assign a Microsoft license to Shared Mailboxes. Shared Mailboxes are also free to create as user mailboxes require a license to build their mailbox.
‘How do I create a Shared Mailbox?’
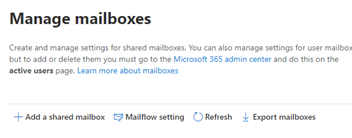
Go to the Exchange Admin Center. Select Mailboxes. You will see a ‘Add a Shared Mailbox’ option.
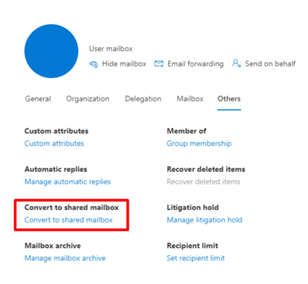
You can also convert User Mailboxes into Shared Mailboxes. Select a User and go to the ‘Others’ tab and press ‘Convert to Shared Mailbox’
‘How do users access the mailbox?’
If the user has the appropriate Microsoft license to use Office products, then the mailbox will appear underneath their personal mailbox.
However, if the user cannot use dedicated office products, then they can access their emails and shared mailboxes through Outlook OWA: https://outlook.live.com/owa/ – They will need to click on their profile icon on the top right hand corner of the page and then select ‘Open another mailbox’. The user will then have to type the name of the mailbox and then open it.
Syncing Shared Mailboxes to user accounts in Outlook can take some time to update. It can take up to 24 hours for the mailbox to appear in their application. Outlook will also require a restart. If the user requires access to the mailbox straight away, redirect them to Outlook OWA.
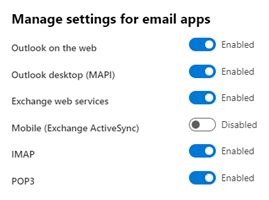
The way a Shared Mailbox can be accessed can also be amended so the Mailbox is only to be strictly accessed through OWA or the desktop app. This can be done by selecting the Mailbox, and then selecting ‘Manage email app settings.’ From there, you can enable or disable ‘Outlook Desktop’ or ‘Outlook on the web’. See below:
This can be useful for when a user requires access to multiple Shared Mailboxes. If a user has a vast number of Shared Mailboxes displaying in their desktop app, then this can cause performance issues on the machine. Every time the user opens Outlook, it will update each mailbox. It can become worse if those mailboxes have Folders/Subfolders as Outlook will go through each one and update it individually.
Outlook OWA has no need to update dedicated inboxes as it communicates directly to the Exchange Server. The response is next to instant. Outlook OWA can then become a tool to increase performance.
‘But I have users that all want to access the mailbox in different ways?’
Note: The Exchange Online PowerShell module has been deprecated. Open normal PowerShell as admin by right clicking the start menu and selecting ‘Windows PowerShell Administrator’.
Connect-ExchangeOnline
- Add-MailboxPermission -Identity “TargetUserEmailAddress” -User “MailboxEmailAddress” -AccessRights FullAccess -AutoMapping $false
- This is useful if the mailbox will show in the Outlook application and the user only wants it on OWA.
- Add-MailboxPermission -Identity “TargetUser” -User “MailboxEmailAddress” -AccessRights FullAccess -AutoMapping $true
- This is useful if the mailbox will only show in OWA but the user wants it on their Outlook application
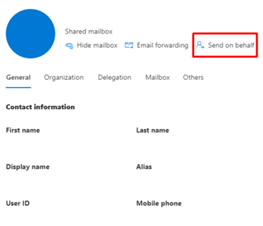
‘How do I give users access to a Shared Mailbox?’
Search for the mailbox in Exchange. Select the mailbox. Go to ‘Delegation’. There will be two editable permissions. ‘Send as’, ‘Send on behalf’ and ‘Read & manage (Full Access)
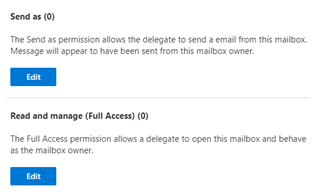
Click on the edit button and search for the user then save your changes.
The delegation for ‘Send on behalf’ can be found by selecting the mailbox and selecting ‘Send on behalf’ on the right-hand side.
‘My Shared Mailbox has an archive; how do I access it?’
By default, the archive of a Shared Mailbox will not be displayed when the Shared Mailbox is attached to the user’s outlook profile. It must match certain conditions. Emails that are yet to be archived will appear in the mailbox. There may be some instances where the archive does not appear.
- The user may require a specific Outlook Client that supports archive mailboxes. Perform an Office Repair or Outlook update.
- The user may require a specific license for the archive to appear.
- Users may need to be granted full access to the mailbox for it to appear.
- Make sure the user has not been assigned permission to the mailbox through a distribution group.
The simplest way of telling a user how to access a Shared Mailbox archive is to direct them through Outlook OWA.
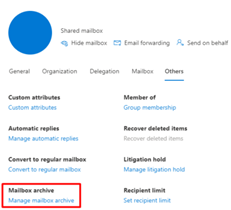
‘How do I enable the archive of a shared mailbox?’
The archive policy will only kick in when the mailbox storage size is under a certain threshold. Many users don’t realize that they are out of space till they are out of space. Once the mailbox size reaches over 90-95% capacity, the archive policy will not start.
You may have to spend time moving emails to the archive manually or deleting emails. But this is time consuming. You can always assign a temporary license to the user to increase their mailbox since so the archive policy takes place.
Archiving has the potential to take a long time. If the mailbox is next to full and emails are over a few years old, it can take up to a few days till the archiving process starts to take effect and make some real storage changes. It is good practice to enable to archive policy upon User/Shared mailbox creation.
The mailbox archive settings can be edited. The default MRM retention policy is 2 years.
Select the Shared/User Mailbox that you wish to enable the archive on. Go to the ‘Others’ tab. You will see a ‘Manage mailbox archive’ hyperlink. Click it and then enable the archive.
Exchange is known to be a little buggy. Even though you enabled the archive, it probably didn’t save. Go back to it and check. If it is not enabled, reenable it again.
‘I can’t see the history of sent messages in my shared mailbox’
Shared Mailboxes do not save sent messages in it’s ‘Sent Messages’ folder. It is instead saved in the Sent Items folder of the user. This is not ideal in organisations as User’s sent emails will bury the Shared Mailboxes Sent Messages. I have come across many instances when the Shared Mailbox is used by multiple people, and they need to record the sent messages of the Shared Mailbox.
This can be configured through Exchange Powershell. (You may need to install this module)
Open Exchange Powershell and connect to the Exchange Server:
Connect-EXOPSSession -UserPrincipalName YourUPN
Then enter the following PowerShell commands:
- set-mailbox EmailAddress -MessageCopyForSentAsEnabled $True
- Messages sent as the mailbox will be saved in the Sent Items Folder.
- set-mailbox EmailAddress -MessageCopyForSendOnBehalfEnabled $True
- Messages sent on the behalf of the mailbox will be saved in the Sent Items Folder.
References:
- https://its.uiowa.edu/support/article/2651#:~:text=First%2C%20you%20need%20to%20give,Individual%20folders%20is%20the%20same.
- https://community.spiceworks.com/topic/2198925-online-archive-on-shared-mailbox-office-365
- https://docs.microsoft.com/en-us/outlook/troubleshoot/profiles-and-accounts/troubleshoot-exchange-online-archive-mailbox-not-shown
- https://docs.microsoft.com/en-us/exchange/troubleshoot/user-and-shared-mailboxes/sent-mail-is-not-saved
![]()